


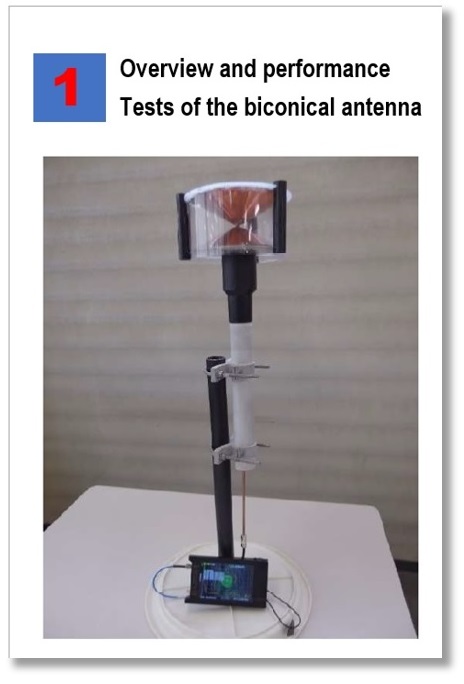
Special Article
Chapter 2,
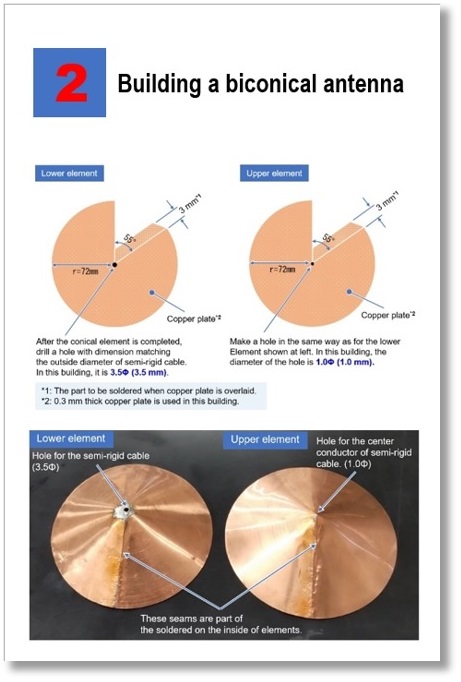
Building a biconical antenna
Materials needed.
The following materials shown in Table 3 are an example of this antenna project.
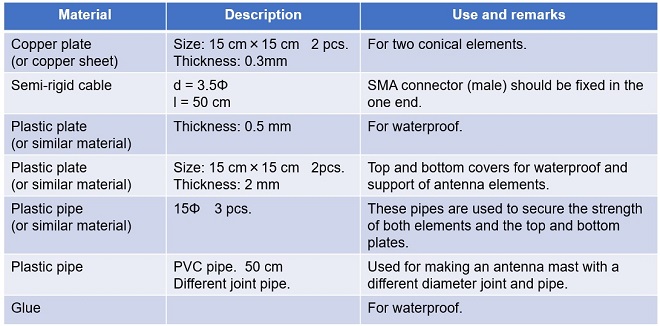
Table 3. Materials required for construction
Tools used for building the antenna.
The biconical antenna was built in the following five parts.
(1) Cutting the copper sheet to be used for the elements.
(2) Forming the cut copper sheet into a conical shape.
(3) Merging the upper and lower elements and attaching the feeder wire.
(4) Processing the different-diameter joints and PVC pipe used for the antenna mast.
(5) Waterproofing the antenna element part.
Each process uses specialized tools. Simple tools are available as shown in Table 4.
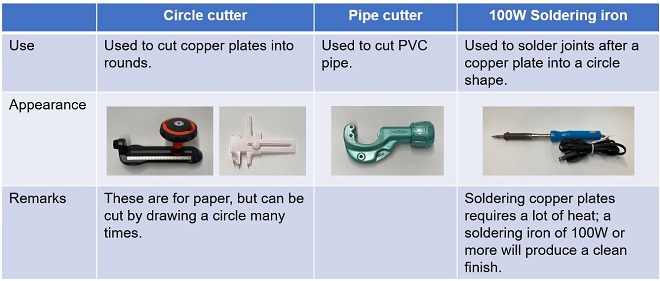
Table 4. Examples of tools required for antenna
Building of the Biconical antenna.
(1) Cutting the copper sheet for the elements
The conical part of the element is cut from copper sheet. I used a 0.3 mm-thick copper sheet, but a thinner sheet may be easier to process. For reference, I also found two types of this a 0.1 mm-thick copper sheet at a DIY store. One is an ordinary copper sheet with nothing on the sheet’s surface. The other is a copper sheet with thin sheet of paper affixed to the surface on one side.
Solder will not adhere if paper is attached, so when forming a cone, the side with the protective paper should be on the outside of the cone. Leaving the paper on the outer side will increase the strength of the element slightly due to the thickness of the paper, in addition to the thickness of the copper sheet itself.
Since this is a vertically polarized biconical antenna two conical sections for the upper and lower elements are built. The basic shape of the two elements is the same, but the size of the holes for the semi-rigid cable differs between the upper and lower elements.
Note: The holes are drilled after the elements are assembled into the cones.
Refer to Figure 6 for the dimensions of the copper sheet from which the element is to be made.
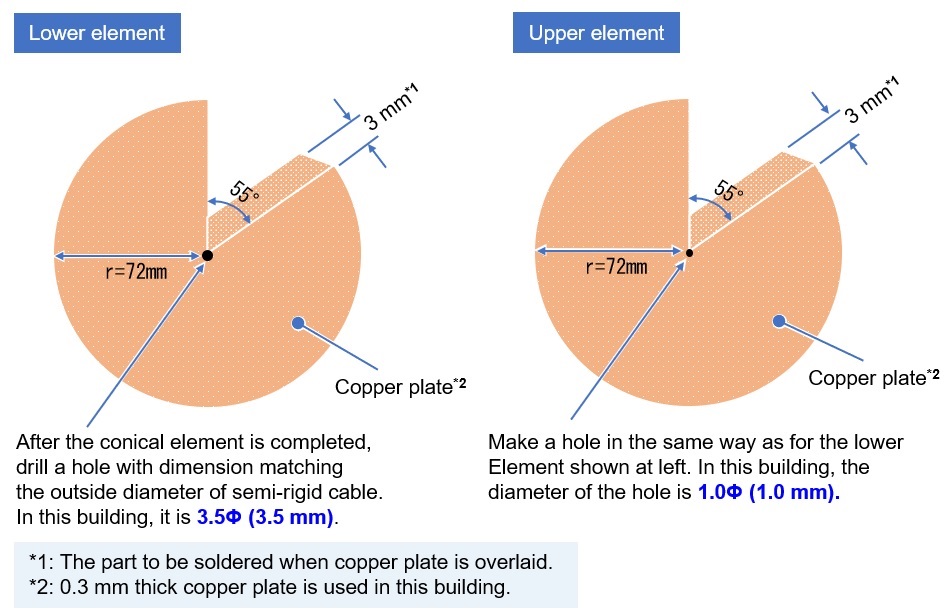
Figure 6. Dimensions of two upper and lower elements.
(2) Finish the cut copper sheet into a conical shape
Finish the copper sheet cut in Figure 6 into a conical shape. Since the joints of the copper sheet are soldered on the inside, if a copper sheet with a thick paper attached is used, the thick paper inside the element should be removed.
The machining of the apex of the cone has a significant impact on electrical performance in the building of elements. The key is to process the cone so that the apex is pointed. Once the cone shape is solidified, the inner seams are soldered to complete the process.
Next, make holes for the semi-rigid cable. Use a drill to make holes a little smaller, and then use a file or other tool to adjust the holes to fit the diameter of the semi-rigid cable. If the holes are too large, solder will flow out through the gap between the holes, resulting in a less-than-perfect finish.
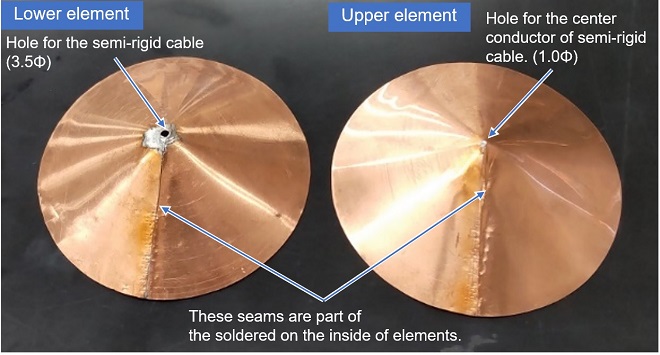
Figure 7. Completed conical element
(3) Combining the upper and lower elements and attaching the feeder wire
The vertices of the completed upper and lower elements are assembled facing each other. At this point, the performance depends on how well the distance between the two elements can be kept without shorting them. The semi-rigid cable used is EXSR-141T-50-CU-CW manufactured by Takitek. The outer diameter is 3.58Φ (3.58 mm) and the core wire diameter is 0.91Φ (0.91 mm). The length was set at 50 cm for convenience, but the cable length should be adjusted according to the combination of loss or installation conditions.
As an assembly tip, first insert the semi-rigid cable into the lower element and solder the outer metal part of the semi-rigid cable and the lower element firmly inside the element. Before soldering the upper element to the center conductor of the semi-rigid cable, place a piece of paper between the top and bottom of both elements. After that, solder the upper element to the center conductor. Then, remove the paper between the vertices, and the two elements can be assembled without shorting each other and with a tight space between them. As experienced during the production process, one of the key points is that the distance between the vertices should not exceed 0.5 mm. Furthermore, lateral misalignment between vertices is also forbidden.
Semi-rigid cables as large as 3.5Φ are hard, and after soldering is completed, the antenna and power feed line feel as if they are one piece. The outer conductor of the semi-rigid cable is a metal tube, so it is hard to bend. Care must be taken in installation.
To ensure the strength of both elements, it is also important to fix each element firmly in place beforehand with resin or other insulating material. All-purpose adhesive was used for fixing.
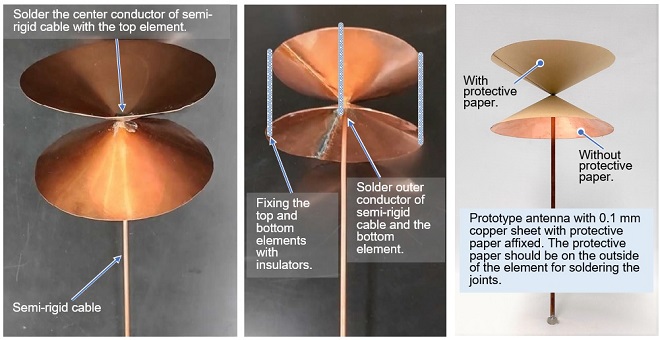
Figure 8. Combining upper and lower elements
(4) Processing different-diameter joints and PVC pipe for the antenna mast
The antenna mast shown on the right side of Figure 9 is built. PVC pipe and different-diameter joint used for plumbing work were used.

Figure 9. Assembly of upper and lower elements
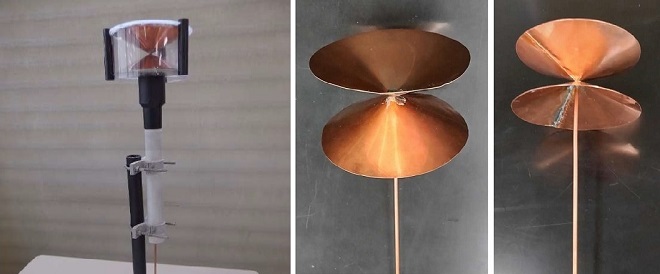
(5) Waterproofing measures for antenna element part
Finally, waterproofing measures are applied. As shown in the illustration on the right side of Figure 9, attach the top cover at the top of the antenna and the bottom cover to be attached under the lower element. In addition, wrap the perimeter of the antenna with an acrylic sheet or similar material. The joint surfaces are glued together to provide waterproofing.
One idea is to use CD (Compact Disk) cases for waterproofing. I tried to make one antenna with the CD case as a prototype of antenna. CD cases are made of translucent resin. If left as is, the smooth surface will not allow paint to adhere. If the surface is made rough with sandpaper, it can be painted as shown in Figure 10. Please try this with materials and ideas you have at hand.
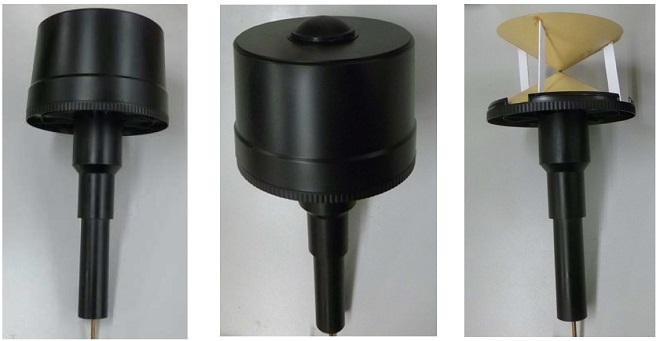
Figure 10. An example of waterproofing measures using a CD case
I made a biconical antenna this time, but I would like to try to make another SHF band antenna.
OUI
Jump to the page you want to read when you click a picture above.